Preamble
You will study in detail the process of installing PostgreSQL 12 on Windows 10.
In addition, we will also install and configure pgAdmin 4, which is a standard and free graphical tool for PostgreSQL DBMS management that we can use for writing SQL queries, developing procedures, functions, as well as for PostgreSQL administration.
What is PostgreSQL?
PostgreSQL is a free object-relational database management system (DBMS). PostgreSQL is implemented for many operating systems such as: BSD, Linux, macOS, Solaris and Windows.
PostgreSQL uses the PL/pgSQL language.
PL/pgSQL is a procedural extension of the SQL language, developed and used in PostgreSQL DBMS.
PL/pgSQL language is designed to create functions, triggers, it adds control structures to SQL language, and it helps us to perform complex calculations.
PostgreSQL is one of the most popular database management systems (TOP 5 popular database management systems).
At the time of writing, the most up-to-date version of PostgreSQL 12 is the one we will be installing.
System requirements for PostgreSQL 12 installation on Windows
PostgreSQL 12 can not be installed on all versions of Windows, in particular, the following versions are officially supported and only 64-bit:
|
As you can see, there’s no Windows 10 on the official list, but installation on this system goes smoothly, as does subsequent PostgreSQL functioning.
In addition, there are other requirements:
- Processor with at least 1 GHz;
- 2 gigabytes of RAM;
- At least 512 megabytes of free disk space (more for installing additional components is recommended);
- It is also recommended that all Windows operating system updates be installed.
Installing PostgreSQL 12 and pgAdmin 4 on Windows 10
So let’s move on to the installation process and look at all the steps that need to be followed in order to install PostgreSQL 12 and pgAdmin 4 on Windows 10.
Step 1 – Downloading the installer for Windows
As mentioned earlier, PostgreSQL is implemented for many platforms, but since we will be installing PostgreSQL on Windows, we need a Windows installer accordingly. You can of course download this distribution from the official PostgreSQL website, here is the download page – https://www.postgresql.org/download/windows/.
After going to the page you need to click on the link “Download the installer”, as a result you will be taken to the site of EnterpriseDB, which prepares graphical distributions of PostgreSQL for many platforms, including Windows, so you can immediately go to this site, here is the link to the download page https://www.enterprisedb.com/downloads/postgres-postgresql-downloads.
Here you need to select the PostgreSQL version and platform, in our case choose PostgreSQL 12 and Windows x86-64.
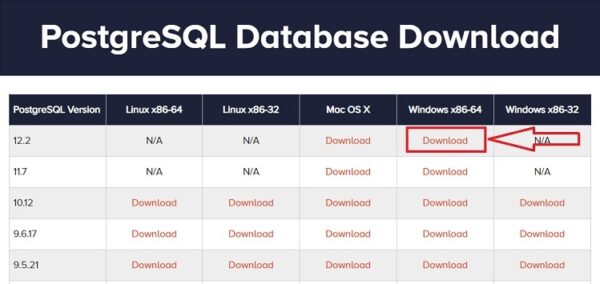
As a result, you should download the file postgresql-12.2-2-windows-x64.exe with the size of about 191 Mbytes (version 12.2-2 is available at the time of writing).
Step 2 – Starting the PostgreSQL installer
Now in order to start the installation you need to run the downloaded file (PostgreSQL installation requires administrator rights).
After the launch, a welcome screen will open, click “Next”.
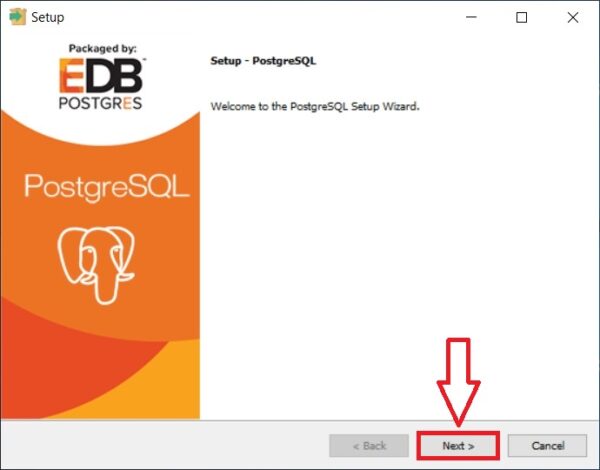
Step 3 – Specify the directory to install PostgreSQL 12
Next, if necessary, we can specify the path to the directory where we want to install PostgreSQL 12, but we can leave it by default. Click “Next”.
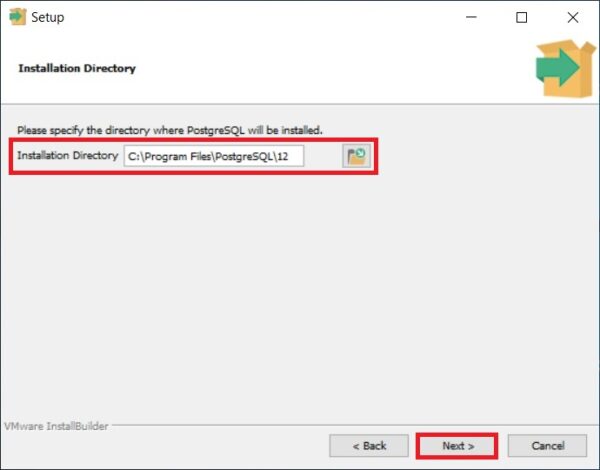
Step 4 – Choose components for installation
Then select the components that we need to install, to do this we leave the checkboxes for the components that we need, and be sure we need PostgreSQL Server and pgAdmin 4.
You can install the command line utilities and Stack Builder on your own, i.e. you can not install them. Press “Next.”
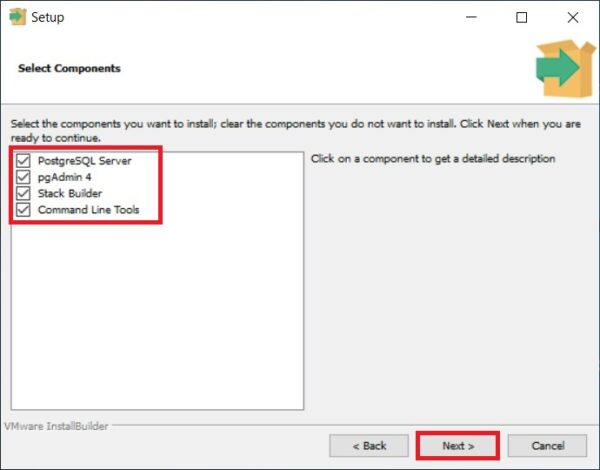
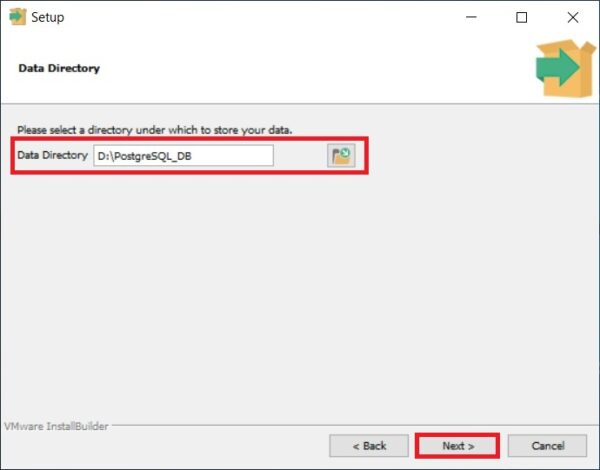
Step 5 -Specify a directory to store database files
On this step, we need to specify the directory where the database files will be located by default.
In the case of a test installation, for example, for training, you can leave it by default, but “combat” databases should always be stored in a separate location, so if you plan to use the PostgreSQL server for some other purposes, it is better to specify a separate disk.
Click “Next”.
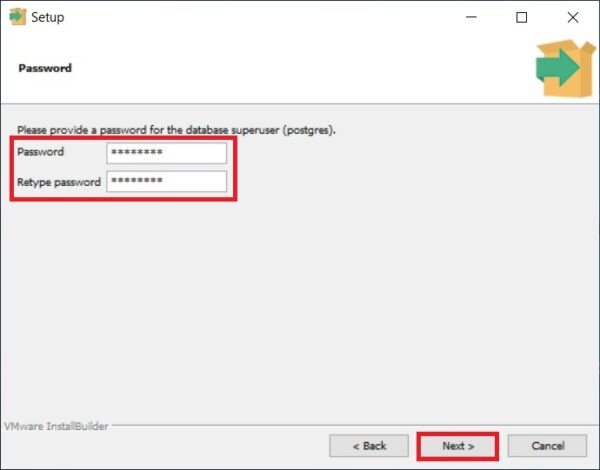
Step 6 – Set a password for the postgres system user
Next we need to set a password for a postgres user – this is a PostgreSQL Server administrator with maximum rights.
We enter and confirm the password. Click “Next”.
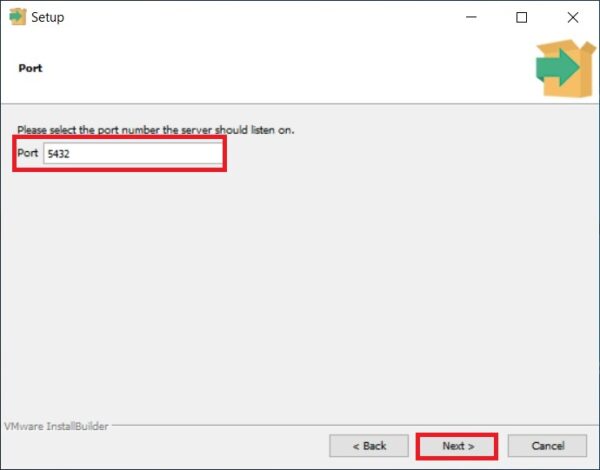
Step 7 – Specify the port for your PostgreSQL instance
On this step, if necessary, we can change the port on which PostgreSQL Server will work, if you do not have such a need, then leave it by default.
Click “Next”.
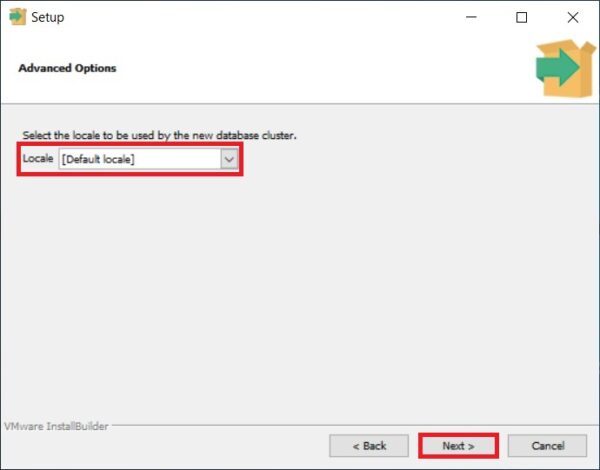
Step 8 – Specify the encoding in the database
Then we can specify a specific data encoding in the database, for this purpose we need to select the desired Locale from the drop-down list.
However, you can also leave it by default by clicking “Next”.
Step 9 – Checking PostgreSQL installation parameters
Everything is ready for installation, at this step we check the parameters we entered earlier and if everything is correct, i.e. everything we entered, we press “Next”.
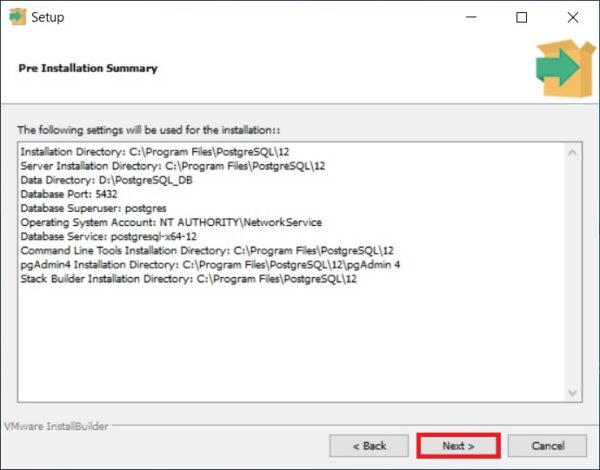
Step 10 – Start the installation process
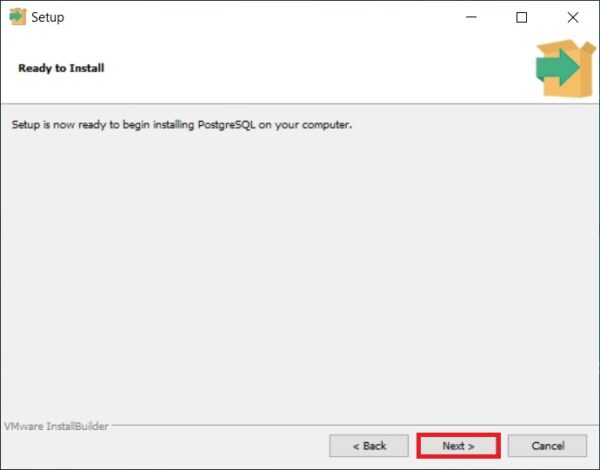
Next you will see another additional window where we must click “Next” to start the PostgreSQL installation process on your computer.
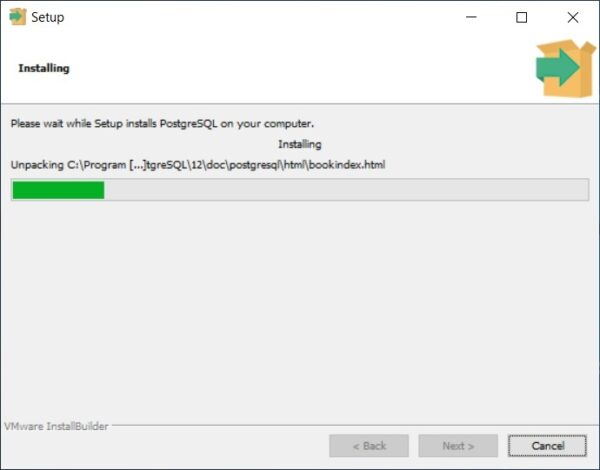
The installation has begun, it will last literally one minute.
Step 11 – Finishing the installation
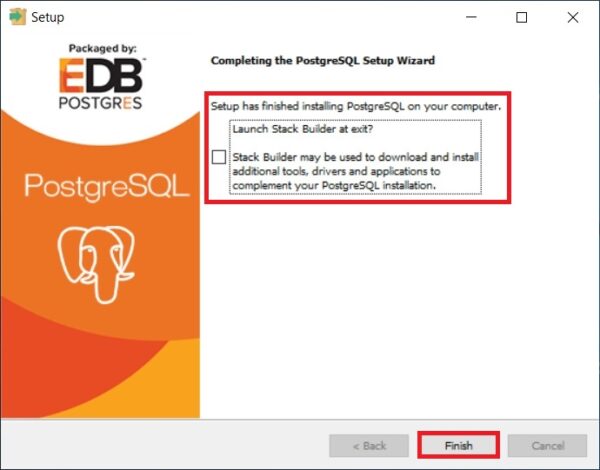
When the “Completing the PostgreSQL Setup Wizard” message window is displayed, the installation of PostgreSQL 12, pgAdmin 4 and other components will be completed.
Also in this window we will be offered to run Stack Builder to download and install additional components, if you do not need it, then uncheck “Lanch Stack Builder at exit?
Click “Finish”.
Run and configure pgAdmin 4
PostgreSQL 12 and pgAdmin 4 we have installed, now let’s start pgAdmin 4, connect to the server and configure the pgAdmin work environment.
To start pgAdmin 4, go to the start menu, find PostgreSQL 12 and pgAdmin 4 in it.
Connecting to the PostgreSQL 12 server
pgAdmin 4 has a web interface, so as a result you should run your browser and open the pgAdmin 4 application.
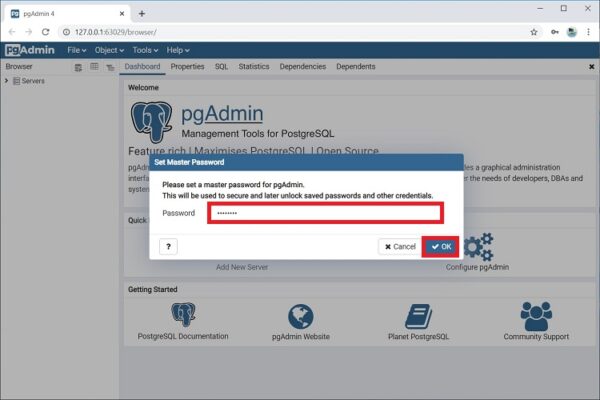
The first time you start pgAdmin 4, you will see a “Set Master Password” window, where we must set a “master password”, this may not be done, but if we save the user’s password (“Save password” checkbox), for example, so that every time you connect you do not need to enter it, it is strongly recommended to invent and specify an additional password here, it is done once.
Enter it and click “OK”.
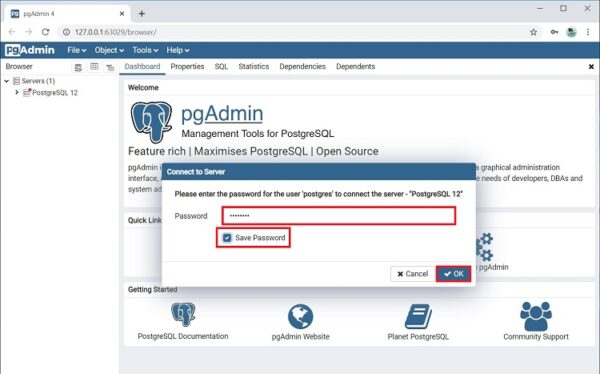
To connect to the newly installed local PostgreSQL server in the server browser, click on “PostgreSQL 12”.
The “Connect to Server” window will start, where you need to enter the password of the postgres system user, i.e. this is the password that you invented when you installed PostgreSQL.
Enter the password, tick “Save Password” to save the password and each time you do not enter it (thanks to the “master password” functionality, all passwords saved in this way will be additionally encrypted).
Click on “OK”.
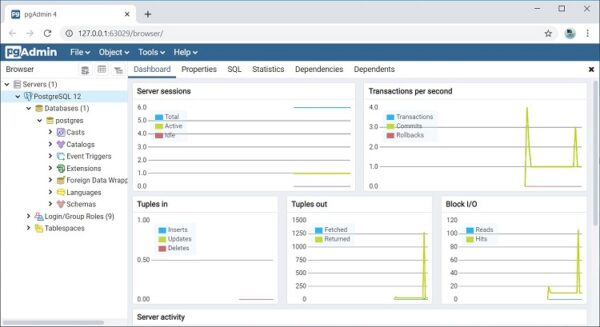
As a result you will connect to the local PostgreSQL 12 server and see all the objects that are located on this server.
Example of writing an SQL query in Query Tool
In order to make sure that our PostgreSQL server is running, let’s write a simple SELECT query that will show us the PostgreSQL server version.
To write SQL queries in pgAdmin 4, you can use Query Tool or Russian “Query”, you can run it using the icon on the panel or from the menu “Tools”.
After you open the Query Tool, write.
SELECT VERSION()
This query shows the PostgreSQL version. As you can see, everything works!
How to Install PostgreSQL 12 and pgAdmin 4 on Windows 10
About Enteros
Enteros offers a patented database performance management SaaS platform. It proactively identifies root causes of complex business-impacting database scalability and performance issues across a growing number of clouds, RDBMS, NoSQL, and machine learning database platforms.
The views expressed on this blog are those of the author and do not necessarily reflect the opinions of Enteros Inc. This blog may contain links to the content of third-party sites. By providing such links, Enteros Inc. does not adopt, guarantee, approve, or endorse the information, views, or products available on such sites.
Are you interested in writing for Enteros’ Blog? Please send us a pitch!
RELATED POSTS
How Can Enterprises Reduce Database Costs Without Sacrificing Performance?
- 11 September 2026
- Database Performance Management
Enterprises can reduce database costs without sacrificing performance by identifying inefficient SQL, right-sizing infrastructure, eliminating unused capacity, analyzing workload patterns, improving storage efficiency, and using database observability to connect resource consumption with application performance. Database cost optimization helps organizations control infrastructure spending while Enteros UpBeat provides performance intelligence, workload visibility, predictive analytics, and Cloud FinOps … Continue reading “How Can Enterprises Reduce Database Costs Without Sacrificing Performance?”
How Can AI Detect Database Performance Anomalies Before They Cause Downtime?
AI can detect database performance anomalies by continuously analyzing workload patterns, SQL behavior, latency, resource usage, waits, and historical baselines. AI database anomaly detection helps identify unusual behavior before it becomes a larger outage. With Enteros UpBeat, IT teams can detect emerging issues earlier, investigate root causes faster, and improve database reliability across complex enterprise … Continue reading “How Can AI Detect Database Performance Anomalies Before They Cause Downtime?”
How Can Financial Institutions Detect Database Bottlenecks Before Transaction Delays Occur?
- 10 September 2026
- Database Performance Management
Financial institutions can detect database bottlenecks before transaction delays occur by continuously monitoring query latency, database waits, CPU, memory, I/O, locking, workload changes, and transaction throughput. By combining performance baselines, anomaly detection, SQL intelligence, predictive analytics, and automated root cause analysis, teams can identify emerging issues early and optimize databases before customer-facing banking, payment, or … Continue reading “How Can Financial Institutions Detect Database Bottlenecks Before Transaction Delays Occur?”
What Role Does AI-Powered Database Monitoring for Banking Play in Performance Management?
AI-powered database monitoring for banking helps financial institutions detect anomalies, identify performance bottlenecks, analyse SQL workloads, predict capacity risks, and accelerate troubleshooting. By combining database observability with automated analysis, AI-powered database performance supports faster incident response, more reliable transactions, better resource utilisation, stronger capacity planning, and smarter cloud cost decisions across increasingly complex banking database … Continue reading “What Role Does AI-Powered Database Monitoring for Banking Play in Performance Management?”