Enteros UpBeat PEi Manual (non-Web)
1 Introduction to Enteros UpBeat Performance Explorer-i 4
1.2 Definitions of basic terms 5
1.3 Special conventions used in this guide 5
2 Getting started with Enteros UpBeat Performance Explorer-i 6
2.1 Installing Enteros UpBeat Performance Explorer-i 6
2.1.1 System installation requirements 6
2.1.2.1 Multiple installations of Enteros UpBeat Performance Explorer-i for Oracle 6
2.2 Start/Stop Enteros UpBeat Performance Explorer-i 7
3.4.1.1.1.1 The chart window and toolbar 13
3.4.1.1.1.2 Chart window context sensitive menu 15
3.4.1.1.3 SQL selection panel and toolbar 16
3.4.1.1.4.2 Time range section 19
3.4.1.1.5 Top search control panel 20
3.4.3 SQL plan change analysis 21
3.4.4 Change impact analysis section 22
3.4.4.1 Change impact analysis 22
3.4.4.2 Parameter change analysis 23
3.4.5 Visual Root Cause Analysis Section 24
4.1 Database performance degradation 28
4.2 Database performance degradation within RAC database cluster or logical database group 28
4.3 Database performance degradation after database upgrade 28
4.5 Database performance degradation after the application ppgrade 29
4.6 Using snapshot compare report data for Visual Root Cause Analysis 29
4.7 Finding top resource consuming SQL 29
4.8 Performing SQL spike analysis 30
4.9 Using Enteros UpBeat Performance Explorer-i for performance reporting 32
4.10 Enteros UpBeat Performance Explorer-i cross database analysis 32
4.11 Enteros UpBeat Performance Explorer-i cross time analysis 33
4.12 Finding time period for top system statistics 37
4.13 Performing top wait event analysis 38
4.13.1 Finding time period of top wait events 39
4.14 Automated performance and headroom analysis 39
4.15 Using Enteros UpBeat Performance Explorer-i in SSH secure environment (tunneling) 40
5.1 Installation related issues 41
7 Enteros UpBeat Performance Explorer-i uninstall 42
8 How to purchase or update your product license 42
8.1 How to order a new license 42
8.2 How to update the license 42
10.1 Enteros product information 45
10.2 Contacting customer support 45
Introduction to Enteros UpBeat Performance Explorer-i
Product overview
Enteros UpBeat Performance Explorer-i™ is a production database performance management and root cause analysis product that enables rapid discovery of database overload causes, replacing complex and time-consuming manual performance analysis and report generating products.
Unique analytical capabilities and user interface of Enteros UpBeat Performance Explorer-i provides user with the clear visualization and analysis of database activity. “Snapshot compare” identifies system and load changes causing changes in performance on a single database or multiple databases, while Visual Analysis System identifies spikes and changes in key database performance indicators.
Product benefits
Enteros UpBeat Performance Explorer-i designed with ease of installation and simplicity in mind. Combination of powerful analytical capabilities and simplicity of operation makes Enteros UpBeat Performance Explorer-i a tool of choice for complex production and development database environments.
Features of Enteros UpBeat Performance Explorer-i include:
- No noticeable impact on database system’s performance
- No need for custom performance data collectors: product uses existing AWR and Statspack data.
- Easy and fast installation, no data objects and stored procedures are installed into customer’s databases
- Easy to use help system and manuals
- Extremely fast operation on vast arrays of collected data with no noticeable impact on system performance.
- Root cause analysis of changes in database performance
- SQL performance analysis engine
- Visual Root Cause Analysis of database performance
- Visual Top Spike Analysis of database performance
- Discovery of changes in database parameters, as well as change timeframes
- Change root cause analysis and visual root cause analysis across multiple databases
- Change root cause analysis and visual root cause analysis across multiple database versions
- Change root cause analysis and visual root cause analysis across multiple RAC nodes
- Change root cause analysis and visual root cause analysis across multiple DataGuard nodes
- Cross-time period analysis combining and displaying multiple time periods based on cross-time profile
Definitions of basic terms
Special conventions used in this guide
This guide uses the following typographic conventions:
| Example | Description |
| File Menu | Bold italic is utilized for the literal names of interface objects used to perform actions (for example, toolbar button names, menu names, icon names, dialog box options, and dialog box titles). |
| Stat > All Programs | The arrow symbol indicates menu path. In this example, choose Start, and then choose All Programs from the Windows start menu |
| Figure: How It Works Flow | Captions of figures. |
| C:\Program Files\Enteros Performance Explorer – i\lib | Paths to the folders and files locations, packages and files names. |
| Recommendation: | Bold is utilized for the most important element you should pay special attention to. |
| <usecase name=”Untitled_usecase”> <sequence name=”Untitled_sequence” proportion=”100″> | Indicates code elements. |
Getting started with Enteros UpBeat Performance Explorer-i
Installing Enteros UpBeat Performance Explorer-i
Before installation:
- make sure the computer upon which Enteros UpBeat Performance Explorer-i is going to be installed meets the system installation requirements;
- close all other applications before running installation file. Installation can be canceled at any time by pressing the ESC key or by clicking the Cancel button.
System installation requirements
The following table contains the minimum system installation requirements for the machine upon which the Enteros UpBeat Performance Explorer-i will be installed.
| Hardware | |
| Component | Requirements |
| Processor | 1 GHz Intel Pentium III or equivalent |
| Memory | 256 MB RAM minimum |
| Hard Disk | 50 MB
Note: Extra disk space will be required if you choose to save reports and graphs crated from within |
| Display | SVGA (1024×768) or higher resolution video adapter and monitor |
| Software | |
| Component | Requirements |
| Operating System |
|
| Databases |
|
| Other Requirements | Java Virtual Machine (J2SE 1.6 or greater) |
Installation
To install Enteros UpBeat Performance Explorer-i, run the pexplorer_i_5003.exe. It is a common setup routine that should be completely self-explanatory. The default installation folder is C:\Program Files\Enteros UpBeat Performance Explorer-i.
Multiple installations of Enteros UpBeat Performance Explorer-i for Oracle
Advanced Enteros UpBeat Performance Explorer-i installer allows you to install and separately upgrade multiple versions of Enteros UpBeat Performance Explorer-i on your computer.
Start/Stop Enteros UpBeat Performance Explorer-i
After the installation is completed the user can start the Enteros UpBeat Performance Explorer-i. In order to connect to a database the user needs to complete the following steps:
- Launch the application in one of the following ways:
- the Start menu (Start > All Programs > Enteros UpBeat Performance Explorer-i )
- the command line by navigating to the Enteros UpBeat Performance Explorer-i install folder and running the pei_11.bat (pei_10.bat) file. (Launch files may differ depending on Oracle version number: select the needed).
- Connect to the desired database or multiple databases:
- The Database login dialog appears right after the user has started the application.
 |
| Figure: Database Login Dialog |
- In the ‘Database TNSNAMES alias or Thin URL’ text field enter database TNSNAMES alias or JDBC database URL.
- Set the instance number required for the analysis session (the default instance number is 1).
- In the ‘AWR/Statspack User’ text box enter name of the user authorized to read statspack tables or AWR performance views (empty statspack username defaults to “perfstat”).
- In the ‘Password’ text box enter password of the user authorized to read statspack tables or AWR performance views (empty password defaults to be the same as the username).
 |
| Figure: The UpBeat Console |
Note: the Performance Explorer’s UpBeat console is launched simultaneously with the main program and enables the user to monitor the Performance Explorer’s state and behavior. The user must remember that closing the UpBeat console will close the main program window as well.
Licensing
New users of Enteros UpBeat Performance Explorer-i will have a trial period in order to test the product. When the trial period expires, Enteros UpBeat Performance Explorer-i will stop functioning. To maintain full functionality users should contact Enteros, Inc. representatives for information on obtaining a full licensed version.
Once the user obtained a license, has started the Enteros UpBeat Performance Explorer-i product and initiated connection to a database an Input License window appears. The license key must be entered. The Enteros UpBeat Performance Explorer-i will start at once in case of successful validation.
The detail information on how to purchase/update the license you can find here.
Product navigation
Overview
The Enteros UpBeat Performance Explorer-i navigation is represented via the following functional areas:
- File menu
- Actions toolbar – both menus contain file management related options.
- Perspective area – serves as a working area of the interface once some section is selected in the Tasks Navigation Pane.
- Analysis options panel – enables users to quickly switch between all PE analyzing sections.
- Measurements – shows available type of statistic for analysis.
 |
| Figure: The Main Interface |
There are three persistent navigation elements that provide access to all functional areas of the Enteros UpBeat Performance Explorer-i interface: File menu, Actions toolbar and Tasks navigation pane. All these menus are always visible at the left hand side of the screen.
File menu
The File menu can be accessed at all times and consists of five areas: Connect, Options, Chart Bag and Help. The table below contains a brief summary of these areas:
| File Menu – Table of Parameters | ||
| Element | Icon | Description |
| Connect | Contains commands relating to database connection and program shutdown. | |
| Connect to performance data repository… | Initiates connection to the selected databases. | |
| Take Snapshot | Enables a user to take snapshot of the current state of the system. | |
| Refresh Current Database Info | Updates current database details. | |
| Exit | None | Closes the Enteros UpBeat Performance Explorer-i. |
| Options | Contains workspace related options and presets. | |
| Tune Selected SQL | Enables a user to tune selected SQL statements. | |
| Cross Time Profile Editor… | Opens Cross Time Profile Editor window that enables users to perform quick cross-timeframe analysis with selected parameters. Refer to the ‘Enteros UpBeat Performance Explorer-i Cross Time Analysis’ tutorial for details. | |
| Swap Panels | Enables a user to swap Tasks Navigation Panel and working area. | |
| Color Skin… | Enables users to select background color for the working area of the interface. | |
| Chart Bag | Contains shortcuts that enables a user to perform various functional task. | |
| Add Selected Items to Chart Bag | Enables users to add selected items to ChartBag for further report generation. | |
| Add Top Search to Chart Bag | Enables users to add selected items to ChartBag for further report generation. | |
| Load Template … | Enables a user to open previously saved template. | |
| Save Template | Enables a user to save the chart element template by updating the
last saved version of the file to match the current version. |
|
| Save Template As | Enables the user to save the template by bringing up a
prompt to save it as a file with a different name or/and different location. |
|
| Create Parameter File for Batch Run | Enables the user to create parameter file for further batch processing of ChartBag reports. | |
| Help | ||
| Help Contents | Opens the internal help guide. | |
| Tip of the Day | Opens the dialog that is intended to display information about features the user may have missed. Previous Tip/Next Tip controls are used for navigation between tips. | |
| Register License | None | Allows a user to register the product by specifying the license number in the corresponding window. |
| Submit Feedback | Enables users to send their comments to Enteros’s support department. | |
| About Performance Explorer – i | Provides the user with license and software version information, provides access to the product’s system data tab. | |
Actions toolbar
The Actions toolbar is positioned directly below the File menu and provides fast and easy access to many of the functions contained in the file menu and in the tasks navigation panel. Both menus are always visible at the upper left hand side of the screen.
The table below contains a brief summary of these areas:
Analysis options panel
The Analysis options panel plays a key role in the interface by providing users with an ability to quickly switch between all analyzing sections. The panel displays sections names as a list, each section has collapsed sub-sections. Sections names are displayed one below to each other as shown below.
 |
| Figure: Analysis Options Panel |
Users can view each section/sub-section menus at the main work area of the interface.
SQL Analysis section
The SQL Analysis section includes three subsections: SQL Analysis, SQL Plan Search and SQL Plan Change Analysis. Their options provide users with full control on finding top resource-consuming SQL statements and allow to create visual analysis in order to identify exact timeline of that statements impact on database performance. The further actions can be carried out:
- investigation of top SQL based on SQL statistics or SQL statistic ratios;
- aggregation of groups of SQL for group visual analysis;
- overlaying of current data with historical information;
- performing of cross-time analysis for selected SQL statements;
- performing execution of plan analysis for selected SQL statements.
 |
| Figure: SQL Analysis Navigation Panel (extended view) |
SQL analysis
The SQL analysis subsection provides users with detailed analysis and visualization of the most problematic SQL statements impacting database performance.
The chart window and toolbar
A chart base on the selected SQL data appears after pressing the ‘Chart’ control in the perspective area:
| Figure: The chart window and toolbar |
| The Chart Window – toolbar controls | |
| Icon | Description |
| Create chart analysis | |
| Reset zoom to original size. | |
| Statspack Compare Report on Selected Chart Section (Superimposed Chart Only). | |
| Create Top SQL Report on Selected Chart Section. | |
| Generate SQL and wait events correlation report for the currently selected chart area | |
| Generate Oracle AWR report for the currently selected chart area | |
| Generate Oracle ASH report for the currently selected chart area | |
| Create Spike Report of currently selected spike analysis area. | |
| Users can search for particular values over specified number in the corresponding field. | |
| Record Selected Timeline as Baseline. | |
| Set investigation timeframe according to the current chart timeline. | |
Point the mouse cursor over the top of any chart data point to view the details.
 |
| Figure: Additional Information about the Statement |
Double-click on a chart data point opens SQL analysis report for the SQL statement associate with the given data point.
Chart window context sensitive menu
Right clicking on any place of the window will open a context sensitive menu that allows further actions to be carried out on the chart:
 |
| Figure: Context Sensitive Menu |
Note: Save as… option saves selected chart in “.png” format.
SQL search panel
The SQL Search panel is used for searching and filtering SQL data.
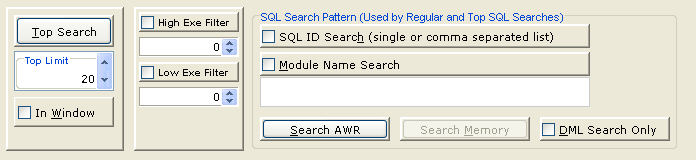 |
| Figure: SQL Search panel |
Search can be accomplished by providing search pattern or comma separated list of SQL Ids, module names or DMLs. In case of activation these filtering options the corresponding checkbox needs to be selected.
| SQL search pattern controls | |
| Control | Description |
| Top search | Executed top SQL search |
| Top limit | Top SQL search limit |
| In Window | Open search results in a separate window |
| SQL search pattern | Filter SQL search by pattern (table or column name, etc) |
| SQL ID search | Filter search SQL using comma separated list of SQL IDs |
| Module name search | Filter search SQL by modules name pattern. |
| DML search Only | Filter search to DML statements only. |
| Search memory | Search in database memory. |
| Search AWR | Search in Automatic Workload Repository (AWR). |
| High exe filter | Filters SQL statements where number of executions is more or equal to specified limit |
| Low exe filter | Filters SQL statements where number of executions is less or equal to specified limit |
SQL selection panel and toolbar
The SQL selection control panel consists of SQL statements result and several control elements that enable users to select data to investigate or to chart.

|
| Figure: SQL selection panel and toolbar |
| Statistic selection control panel –controls | |
| Control | Description |
| Aggregate selected SQL under name: | Enables a user to group multiple SQL statement together for group visual analysis. |
| Create SQL charts or SQL chart analysis
|
Create chart of selected SQL statements or execute SQL spike analysis |
| Display SQL plan
|
Enables a user to generate execution plan for the selected SQL Statement. Created SQL execution plan presentation features ‘where clause’ per explain plan step and separation of cost between CPU cost and I/O cost.
Initially SQL Explain displays plans recorded by Statspack/AWR. If such data are not recorded, explain plan is executed and resulting plan is shown to the user. The user can modify SQL and re-explain statements as needed. |
| Create custom SQL statistics ratio
|
Allows users to define custom ratios, such as CPU_TIME/PARSE_CALLS, etc.
Pressing the ‘Create Custom SQL Statistics Ratio’ opens the dialog that enables the user to define custom SQL statistic ratio.
Figure: Create Custom SQL Statistics Ratio |
| Generate AWR SQL report
|
Generates AWR SQL report using selected SQL statements |
| SQL statements | SQL search result list allows users to select a list of SQL statements to investigate. This list contains both the original SQL performance statistics, as well as pre-defined and user-defined SQL performance statistics and ratios |

Note: Point the mouse cursor over the ellipsis mark (…) to view full information about the module.
 |
| Figure: Full Information about the SQL module |
Double-click on an SQL statement’s id opens SQL plan window
Settings panel
The Settings Panel consists of the following blocks: Time range block and Chart block. Note: Also the Settings panel is a common element that user can encounter in several analyzing sections.
Chart block
The Chart Block is one of the common control elements that allows users to set parameters for visual analysis and create graph that contains analysis results.
 |
| Figure: Settings – Chart Block |
| Chart block –controls | |
| Control | Description |
| Spike analysis | Creates top spike analysis chart of performance metric statistic.
Example: Top Chart Visual Analysis of SQL “BUFFER GETS“displays results of analysis as continuous visual display of N-top BUFFER_GETS SQL Statements for every time point of the provided time range. |
| Chart as % of total | Displays results of analysis as percent of overall value of performance metric statistic.
Example: Create Visual Analysis of “TOTAL_WAITS “ of “db file sequential read”, display results of analysis as % of overall “TOTAL_WAITS” time across all events. |
| Split metrics | If unchecked enables user to combine analysis of multiple performance metrics on a single graph; if checked enables user to split it into separate graphs (one per performance metric). |
| Smooth (Average) chart data over … | Neutralizes performance metrics data over the selected time period. This option is especially useful during visual analysis of long time periods, since it eliminates visual clutter introduced by large numbers of data points. |
Time range section
The Time range section allows users to set time periods of the root cause analysis. It includes the following blocks
 |
| Figure: Settings – Time Range Block |
| Time range sections – table of parameters | |
| Component | Description |
| Time amount | Enables user to set time period for analysis in terms of amount of time. Optionally, time offset from a point in the past can be used.
Example: Use “1 Day” of data or “Use 1 Day of Data starting 1 Week Ago”. |
| Snapshot range | Enables user to set time period for analysis in terms of starting and ending statspack/AWR snapshots.
Example: Snapshot Range between snapshots 62640 and 62678. |
| Time range | Enables user to set time period for analysis in terms of starting and ending timestamps.
Example: Start Time is set to 04/05/2006 14:00 and 04/05/2006 16:15. |
| Database list | Displays list of currently connected databases. User can make database active within a panel by double-clicking it with the pointing device. To make database active across all panels, user should triple-click selected database with the pointing device. |
| Superimpose time amount | Enables user to select time period to superimpose with the one selected in the Time amount, Snapshot range and Time range blocks by indicating how far in the past the corresponding time period should be taken from.
Example: Use Superimpose Data starting “1 Week” ago. |
| Superimpose start time | Enables user to select time period to superimpose with the one selected in the Time amount, Snapshot range and Time range blocks by indicating the starting timestamp of that period.
Example: Superimpose Time is set to 03/29/2006 14:00. |
Top search control panel
The Top search control panel allows users to set parameter for Top search of the database performance metrics. Top search allows a user to display and monitor top database metrics (e.g., wait events), i.e. metrics that have predominant impact on database performance.
 |
| Figure: Top Search Control Panel |
| Top search control panel – table of parameters | |
| Component | Description |
| Top search | Initiates the search. |
| Top limit | The spinner that enables a user to set amount of top search results elements to return. |
| In window | If enabled opens Top search result in a separate window. This option is helpful when multiple top search results are needed to be created and reviewed at the same time. |
| Pie chart | Creates a Pie chart graph in addition to the table based Top search report. (Available only for several subsections of Visual Root Cause Analysis section). |
SQL plan search
The SQL plan search subsection enables a user to perform search for a particular SQL execution plan.
 |
| Figure: SQL Plan Search |
The Time range block is located directly below the Search parameters form and has the same functionality as described here.
| SQL plan search – table of parameters | |
| Component | Description |
| Search SQL plan information | Initiates the search. |
| Object name | Object name – table, index or partition accessed by problem, access part |
 |
| Figure: SQL Plan Search Results |
| SQL Plan search results – table of parameters | |
| Column | Description |
| Time | Time at that the action took place. |
| SQL_ID/Hash Value | Unique SQL statistic element’s identification name. |
| Cost | Cost value. |
| Object | Objective of the action. |
| Operation | Operation that took place. |
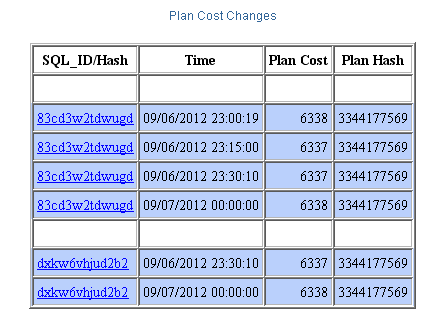
SQL plan change analysis
The SQL plan/cost change analysis section enables finding the list of SQL statements that have modified it’s execution plan or execution cost within a user provided time interval, as well as exact timeline for every change. SQL Plan/Cost Change Analysis helps a user to determine if a change in database performance may be correlated to changes in execution plan or execution cost of certain SQL statements.
The section consists of two elements: SQL plan and cost change analysis control (that executes creation of the report) and Time Range block (that enables users to specify time parameters).Note: These parameters were described earlier in this guide.
 |
| Figure: SQL Plan Change Analysis Subsection |
SQL plan
Below is a sample SQL Plan/Cost change analysis report, indicating changes and timeline of changes in the cost and plan hash value of SQL statements
 .
.
Change impact analysis section
The Change impact analysis section provides a user with detailed reports that reflect such alterations as changed SQL statistics, newly introduced SQL, changed SQL plans, system statistics, wait events, latches, as well as many other performance metrics that crossed the changed threshold and can potentially be the root cause of negative trends in database availability and performance.
The section has two subsections that cover the described above functionality:
 |
| Figure: Change Impact Analysis Navigation (extended view) |
Change impact analysis
This subsection enables users to receive detailed change profile of database performance, compared to the baseline period. It consists of the following control panels:
- Fast analysis panel that allows users to perform fast root cause analysis based on comparison of most recently collected performance data with the preset past time periods.
 |
| Figure: Change Impact Analysis – Fast Analysis Panel |
- Compare timeline panel that allows users to set period of time to perform change root cause analysis.
 |
| Figure: Change Impact Analysis – Fast Analysis Panel |
- Baseline Timeline Panel that allows users to set period of time to be used as a baseline for the change root cause analysis.
 |
| Figure: Change Impact Analysis – Fast Analysis Panel |
Parameter change analysis
The Parameter change analysis scans a time period provided by the user and identifies any changes in database parameters that were made during specified period by users or by the system.
 |
| Figure: Parameter Change Analysis |
Below is a sample parameter change analysis report, indicating changes and timeline of changes in the “sort_area_size” database parameter.
Visual Root Cause Analysis Section
Multiple Visual Root Cause Analysis sections enable users to find performance problems quickly by visual comparison. By viewing graphical representations of changes in key database metrics (including system statistics, wait events, latches, enqueues, segment I/O, datafile I/O, “Undo” tablespace I/O, rollback segments I/O, dictionary cache, library cache, and customer user SQL) it is very easy to analyze changes in database behavior.
 |
| Figure: Visual Root Cause Analysis Navigation (extended view) |
The section consists of several subsections that are responsible for various types of database performance metrics:
- System Statistics provide information on CPU and resource used by Oracle users, and also the calls, commits, and rollbacks the users initiate.
For tutorial on how to use the system statistic subsection for visual root cause analysis refer to the ‘Finding Time Period for Top System Statistics‘ section.
- Wait Events
For tutorial on how to use the system statistic subsection for visual root cause analysis refer to the ‘Performing Time Range Top Wait Event Analysis’ section.
- Latches
- Enqueue statistics provide information about the locks.
- Segment I/O
- Datafile I/O
- Undo I/O
- Dictionary Cache
- Library Cache
- Custom Chart
The subsection consists of a single Chart Control Panel element – Chart control and a text box for entering custom SQL.
 |
| Figure: Custom Chart |
RAC Analysis Section
RAC Analysis section enables users to easily analyze changes in RAC cluster behavior by graphically displaying most important RAC (Real Application Clusters) performance statistics and other performance metrics, and enables users to visually overlay graphs corresponding to different RAC nodes and time periods.
 |
| Figure: RAC Analysis Section Navigation (extended view) |
Create reports
With Enteros UpBeat Performance Explorer-i ChartBag feature ChartBag reports can be generated automatically and simultaneously across hundreds of databases, using predefined report templates. Report Templates can be saved and run in a batch mode for further web publishing.
Simply started, a ChartBag report generator allows users to:
- create performance reports as well as performance report templates both in interactive and batch modes;
- combine multiple performance metrics from different Enteros UpBeat Performance Explorer-i analysis sections into a single report that can be generated interactively or produced automatically in a batch mode.
ChartBag components can include single database performance metrics, such as system statistics or wait events, SQL statements and SQL statement performance ratios, Top Search results across performance metrics and SQL statements as well as information about database system I/O performance (file systems, tablespaces and data files).
In order to generate report it is needed to add components into the ChartBag. There two way to add components:
- via the Actions Toolbar by clicking on the Add Items to Chart Bag button;
- via File Menu > Chart Bag > Add selected Item to Chart Bag.
Note: Top search results can be added to a ChartBag Report using file menu option – Chart bag > Add Top Search to Chart Bag.
The section is combined from Chart Control Panel, Statistic Selection Control Panel with managing controls (Up/Down/Delete) and Time Range Block.
The Chart Control Panel differs from the original in number of controls and presence of a Save as HTML control, that gives users an ability instantly generate graphical reports in .html format.
 |
| Figure: ChartBag Reports Section |
For tutorial on how to generate reports refer to the ‘Performance and Headroom Creation for a Web Site’ section.
Example tutorials
This section contains sample scenarios that demonstrate how Enteros UpBeat Performance Explorer-i can be used to troubleshoot database performance issues and find out the root cause of performance degradation. These scenarios are provided as recommendations for using Enteros UpBeat Performance Explorer-i in production and development environments.
Database performance degradation
Case: At some point of time, database performance and response time become inadequate for business requirements.
Recommendation:
- During immediate problem investigation it is advisable to compare first period of inadequate performance with the closely adjacent period of adequate performance – this investigation helps a user to identify what immediate changes could potentially cause the performance and/or availability problems.
Example: If a database issue started at 2:10 PM and the performance snapshots were taken every 15 minutes, investigation could use time period of 1:45 to 2:00 PM as a baseline period and time period of 2:00 to 2:15 PM as a compare period.
- Considering that database load is cyclical in nature, corresponding to the business cycles (as on many OLTP systems) it is recommended to compare problematic period of time with the comparable period of time when the database performance was adequate. If database operates in a weekly cycle, it is possible to compare performance of current period of time with the similar period of time one week ago (One day / one month, etc.)
Example: If database issues started on 10/05/2009 at 3:35 PM, and the performance snapshot are taken every 15 minutes, an investigation could be done by using time periods of 09/30/2009 3:30 to 3:00 PM as a baseline period and time period of 10/05/2009 3:30 to 3:45 PM as a compared period.
Database performance degradation within RAC database cluster or logical database group
Case: At some point of time, database performance and response time become inadequate for business requirements, while the performance of other nodes in database cluster/group remains acceptable.
Recommendation:
- Use option of cross-database performance analysis – set adequately performing database cluster node as a baseline mode and problematic node as a compare node:
Example: If the problems in database node DB0N1 occurred at 3:35 PM and performance snapshots were taken every 15 minutes, investigation could use the time periods of 3:30 to 3:00 PM on node DB0N0 as a baseline period and time period of 3:30 to 3:45 PM on node DB0N1 as a compared period.
- Use the approach described in the ‘Database performance degradation’ section to identify root cause of the changes comparing to the time period for the same database when performance was acceptable,
Database performance degradation after database upgrade
Case: After a database was upgraded, the database performance became inadequate.
Recommendation:
Compare database performance related to the time period before the upgrade (baseline) to the database performance after the upgrade.
Database performance degradation within logical group of databases, different database versions
Case: After production database upgrade, the performance of database in logical group became inadequate for business requirements comparing to different nodes in the database group.
Recommendation:
Use option of cross-database performance analysis – set an adequately performing database in the group as a baseline and a problematic database as a compared node.
Database performance degradation after the application ppgrade
Case: After the application accessing the database was upgraded, the database performance became inadequate.
Recommendation:
Compare database performance related to the time period before the upgrade (baseline) to the database performance after the upgrade.
Note: The same schema is true in case of QA database performance/stress testing when an application developer needs to understand how new application code is loading database comparing to the old application code.
Using snapshot compare report data for Visual Root Cause Analysis
Change root cause analysis report provides the user with detailed change information for the selected areas of database performance. During the root cause investigation, it is extremely important to review areas of analysis that show significant changes in performance metrics values, such as changes in SQL statistics, wait events, etc. Another important area to check is the “NEW” report sections that contain all new performance metrics that were not present in the database during the baseline time period.
Finding top resource consuming SQL
The Top SQL search option allows a user to perform very granular filtering of top SQL by specifying a search pattern and requesting the search to include only DML statements. This flexibility enables the user to spot with great precision which SQL has the most impact on the database performance and stability.
In the below example the user’s request is to perform top executions search on DML statements that include “ITEM_ATTR” pattern (table name in the given case).
 |
| Figure: Using Top Search Option |
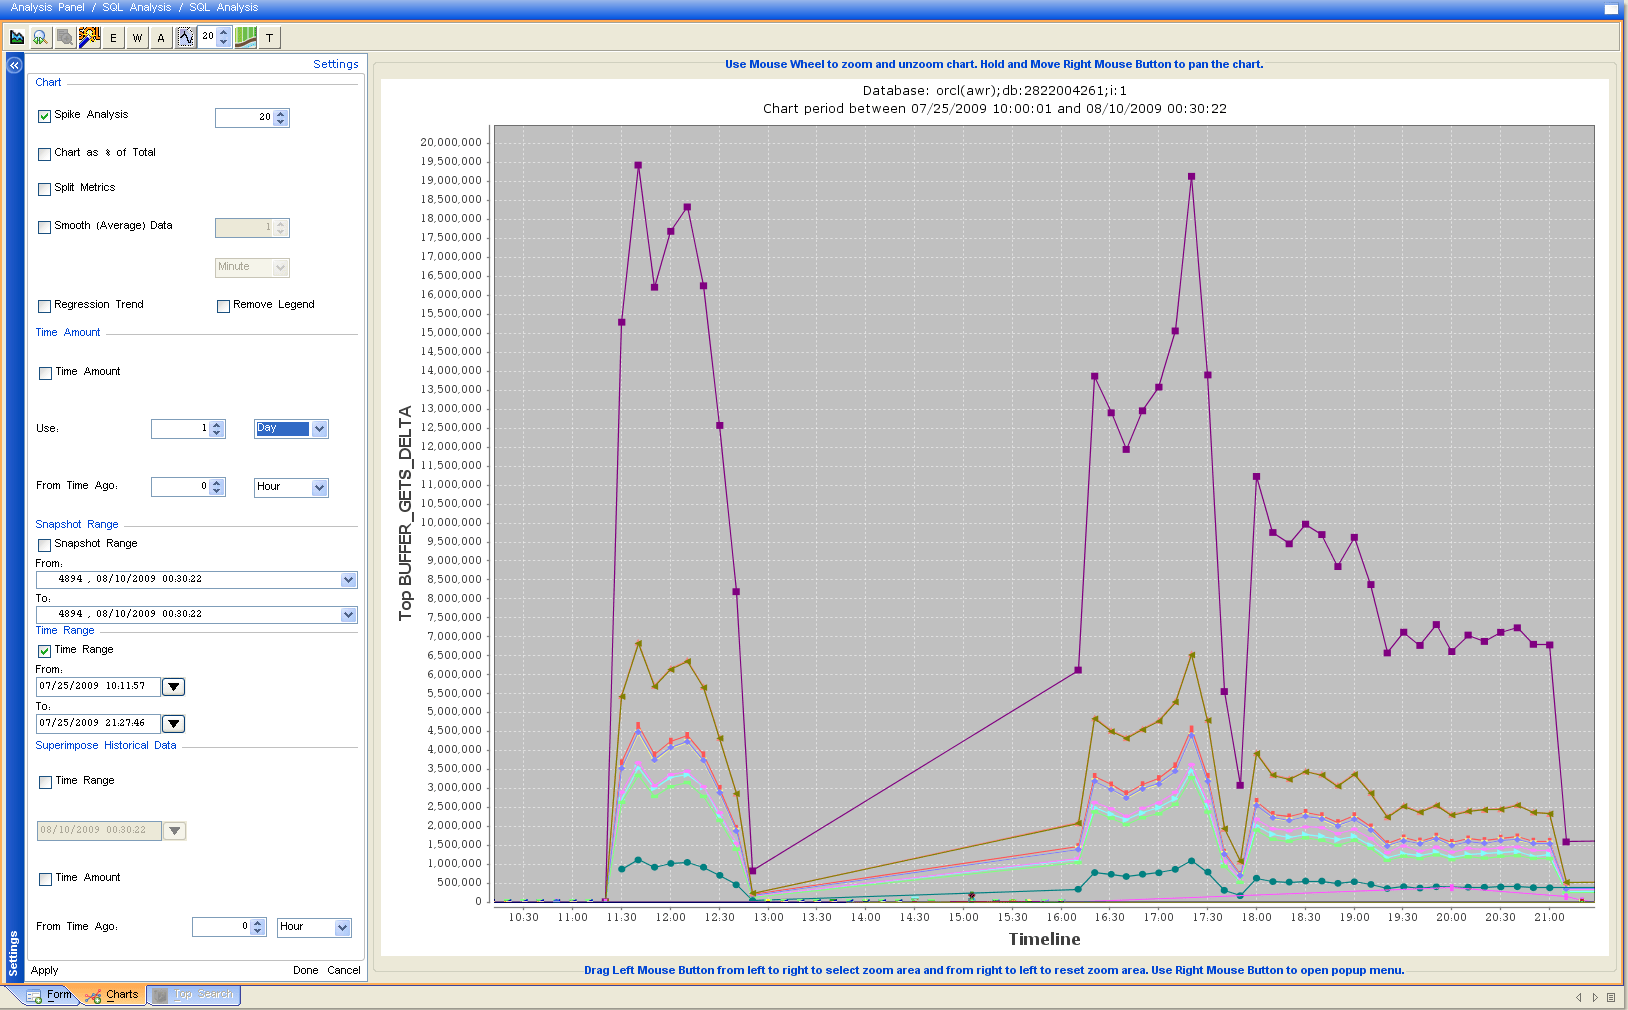
Performing SQL spike analysis
SQL spike analysis allows a user to perform very granular identification of top resource consuming SQL statement for every time point of the analysis time range. In the illustration below the following actions took place:
- In the Chart Block of the Settings panel the checkbox ‘Top Spikes’ is enabled.
- In the Time Range Block the Time Amount is set to using 1 day of data for analysis.
- Pressed the ‘Chart’ button of the Chart Control Panel. The result chart appears in the external window.
 |
| Figure: Performing SQL spike analysis |
SQL spike analysis can be combined with SQL spike report that allows user to identify exact SQL statement and SQL execution plans in the selected time range. To view the SQL spike report a user needs to click on the ‘Create Spike Report’ button as highlighted on the illustration below:
 |
| Figure: Top SQL Spike Report |
Using Enteros UpBeat Performance Explorer-i for performance reporting
Generate ChartBag reports section is used for standardized performance reporting. For getting performance report the following schema should be used:
- Identification of a set of reporting parameters:
– select the desired parameter and click on the ‘Add Selected Items to ChartBag’ button.
- Navigate to ‘Generate ChartBag Report’ section;
- Save this set of reporting parameters as a ChartBag template:
– File Menu > ChartBag->Save Template or ChartBag->Save Template As….
- In order to load and use previously saved template navigate to:
– File Menu > ChartBag->Load Template.
Enteros UpBeat Performance Explorer-i cross database analysis
Enteros UpBeat Performance Explorer-i allows a user to perform simultaneous analysis of multiple databases. Cross database analysis is supported by change impact analysis and by visual root cause analysis sections.
Change impact analysis supports simultaneous cross-database analysis of two databases – one database to be used as a baseline database and the second database to be used as a compared (target) database. Selection of multiple databases for change impact analysis is accomplished by selecting databases from the Database List of the corresponding timeline panels.
 |
| Figure: Selection of Compared and Baseline Databases |
Visual Root Cause Analysis supports visual cross database analysis through the ChartBag facility. The user can add to the ChartBag multiple performance metrics belonging to different databases. The created ChartBag report displays data from multiple databases.
 |
| Figure: Visual Root Cause Analysis through ChartBag Facility |
Enteros UpBeat Performance Explorer-i cross time analysis
Additionally to Visual Root Cause Analysis the Enteros UpBeat Performance Explorer-i gives a user an ability to perform Cross Time Analysis. In its turn Cross Time Analysis allows users to view the present time periods vs. their corresponding historical periods.
For instance, it is possible to create combined analysis graphs using the following cross time ranges:
- Display 1 day of current data over 1 day of data 1 week ago:
- Display 1 week of current data over 1 week of data 1 month ago
- Display 1 month of current data over 1 month of data 1 quarter (3 month) ago
Using of Cross Time Analysis option is extremely helpful in understanding database and system dynamics, performing headroom and capacity estimates.
 |
| Figure: Performance Explorer – i Cross Time Analysis |
To define cross time analysis time ranges is used Cross Time Profile Editor. For launching the editor a user should navigate to File Menu item Options followed by Cross Time Profile Editor.
 |
| Figure: Cross Time Profile Editor |
| Cross-Timeframe Profile Editor – Parameters and Specific Controls | ||
| Element | Description | |
| Time Ranges | List of selected cross time profile’s time ranges (per profile). | |
| Short Range Time Amount | Measurement of current data (e.g. in cross time analysis it will be used 1 unit of current data). | |
| Short Range Time Unit | Type of the unit: minute, hour, day, week or month. (e.g. in conjunction with previously specified short range time amount value in cross time analysis it will be used 1 minute, hour, day, week or month of current data). | |
| Large Range Time Amount | Measurement of corresponding historical data (e.g. in cross time analysis it will be used 1 unit of historical data). | |
| Large Range Time Unit | Type of the unit: minute, hour, day, week or month. (e.g. in conjunction with previously specified short range time amount value in cross time analysis it will be used 1 minute, hour, day, week or month of historical data). | |
| Time Range Control Block | Enables users to add/edit/delete and rearrange time ranges. Time Range Control Block available only for custom profiles. Users can’t perform listed action on the default profile’s time ranges. | |
| Add Time Range | Enables users to specify time range for their custom profile. | |
 |
||
| Cross Time Profile Control Block | Enables users to add/edit/delete and save cross time profiles. Cross Time Control Block available only for custom profiles. Users can’t perform listed action on the default profile. | |
| Add Profile | Enables users to create their custom profile. | |
 |
||
In order to perform Cross Time Analysis:
- select Cross-Time Profile ( the default profile is preset);
- check the corresponding checkbox to set analysis start time for the cross time analysis on a Cross-Time Range Control Panel. Note: If time amount is set to 0, the analysis will be performed on the immediate data.
 |
| Figure: Cross Time Analysis Time Range Selection |
Finding time period for top system statistics
In order to find time period for top system statistics navigate to:
- Visual Root Cause Analysis section > System Statistics subsection.
- Select Top Search tab.
- In the Settings panel set the Time Amount to use 1 hour of data for analysis (the default value).
- Click on the ‘Top Search’ button.
The result statistics will appear in the Top System Statistics tab.
 |
| Figure: Top System Statistics |
Performing top wait event analysis
Top Wait Event Analysis allows user to perform very granular identification of top resource consuming wait events for every time point of the analysis time range.
In order to find time range top wait event analysis navigate to:
- Visual Root Cause Analysis section.
- Select Wait Events subsection.
- Choose type of wait events statistics.
- Check the box Top Spikes.
- Click on the ‘Chart’ button.
The result chart will appear in the external window.
Top wait event analysis can be combined with wait events spike analysis report that gives a user an ability to identify exact top waits events in the selected time range.
 |
| Figure: Top Wait Event Spike Report |
Finding time period of top wait events
In order to find time period for top wait events navigate to:
- Visual Root Cause Analysis section.
- Select Wait Events subsection.
- Choose Top Wait Events tab.
- In the Set Time Periods Panel set the Time Amount to use 1 hour of data for analysis (the default value).
- Select the statistics type (TOTAL_WAITS, TOTAL_TIMEOUTS, etc.)
- Click on the ‘Top Search’ button of the Top Search Control Panel.
The result statistics will appear in the Top Wait Events tab.
If the user wish to view results as a pie chart (in addition to the table based Top Search report) the corresponding checkbox must be checked.
Automated performance and headroom analysis
ChartBag reports can be executed in a batch mode across multiple databases. The resulting report is generated as a set of files in .html format that could be published immediately on a user’s web site. To execute ChartBag reports in a batch mode, a ChartBag parameter file must be created. This can be done by using menu item ChartBag > Create Parameter File for Batch Run or by creation of a text file with necessary parameters.
Sample Batch parameter file:
#>>
# DB1 headroom collection parameter file
#
db=jdbc:oracle:thin:@192.168.1.200:1521:LNX2DB1
user=perfstat
password=perfstat
chartbag=DB1_Headroom.cbg
output=batch_hdr_cbg_db1
width=1024
height=1024
#<<
| ChartBag Parameter File’s Supported Parameters | |
| Parameter | Description |
| # | Comment. |
| Db | Database connection URL. |
| User | Database access user name. |
| Password | Database access user password. |
| Output | Base name for the set of output files. |
| Width | Width of the created graph images in pixels. |
| Height | Height of the created graph images in pixels. |
In order to generate reports in a batch mode automatically the following actions must be performed.
- For UNIX operating systems:
- Using crontab automatic report generation as
- pei<v>.sh parfile=<parameter_file_name>
- where v is the Oracle Client version.
Example:
pei9.sh parfile=weekly_db0.cbg
For Microsoft Windows operating systems:
Using windows task scheduler schedule as
pei<v>.bat parfile=<parameter_file_name>
where v is the Oracle Client version.
Example:
pei9.bat parfile=weekly_db0.cbg
The result .html files are generated in the html folder under Enteros UpBeat Performance Explorer-i installation directory. (C:\Program Files\Enteros UpBeat Performance Explorer-i\html).
Using Enteros UpBeat Performance Explorer-i in SSH secure environment (tunneling)
When direct TNS connection from a desktop to a database is not allowed due to security restrictions, a user can create SSH tunnel in order to connect to a database on a remote host. An SSH Tunnel can be created using PuTTY, SecureCRT or any other SSH terminal software that supports tunnel creation.
Example: Setting up an SSH tunnel for default database listener port 1521.
Via PuTTY:
select SSH > Tunnels category;
set the Source port to1521;
set the Destination to db_host:1521;
Via SecureCRT:
navigate to Session Options > Advanced > Port Forwarding;
set the Local Port to 1521,
set the Remote Hostname to db_host.
set the Remote port to 1521.
After the SSH tunnel is set up, it is needed to change tnsnames.ora entry to have “127.0.0.1” or “localhost” instead of <db_host> name. For thin URL connections it is needed to use “127.0.0.1” or “localhost” as well.
Troubleshooting
Installation related issues
If during the installation process Oracle Enterprise Manager client is active, the installer may stall. To resolve this issue, close Oracle EM client during the installation process
Startup related issues
Enteros UpBeat Performance Explorer-i may fail to startup if during the installation process the user chooses not to install the provided JRE (Java Runtime Environment). It is strongly recommended to use JRE packaged with Enteros UpBeat Performance Explorer-i.
Connectivity issues
Sometimes, due to minor differences between the provided JDCB drivers and the installed Oracle client, connection to database, using tnsnames connection name cannot be successfully established.
In this case, it is recommended to copy JDBC drivers from Oracle client installation to the “Performance Explorer\lib” and rename them to the proper classes12<oracle version>.jar name, i.e. classes129.jar is a proper name for Oracle 9i and classes1210.jar is a proper name for Oracle 10g
Other known issues
Negative value for SQL statistics displayed as a result of the Top SQL Search
The SQL Analysis Top SQL Search component of the Enteros UpBeat Performance Explorer-i may display a negative value on a SQL Top Search Statistic or on a displayed SQL ratio. This occurs when in a heavily used database system the value of the SQL performance statistic counter is growing over 4×10^9 and becoms negative. This affects all Oracle versions 8i, 9i, and 10g.
Downloading upgrades
From time to time, Enteros, Inc. may make upgrades and patches available on the Internet. Upgrades will be made available from the Enteros web site at www.enteros.com.
Enteros UpBeat Performance Explorer-i uninstall
To unistall certain or all components of Enteros UpBeat Performance Explorer-i, go:
Start > All Programs > Enteros UpBeat Performance Explorer-i > Uninstall
or
Start > Control Panel > Add or Remove Programs > Enteros UpBeat Performance Explorer-i > Remove
How to purchase or update your product license
How to order a new license
For information on how to order Enteros UpBeat Performance Explorer-i product license please contact:
E-mail to Sales & Marketing: sales@enteros.com
Tel. Sales: 408-824-1292, x2
How to update the license
In order to update your expired license file you must navigate to it’s location on your HDD:
.\Enteros UpBeat Performance Explorer-i\lib\pei.lic
Replace your old license file with a new one.
Glossary
| Term | Definition |
| B | |
| Batch Mode | Or batch processing means performing a particular operation automatically on a group of files all at once rather than manually processing one file at a time. |
| I | |
| IOSTAT | Input/output statistics is a computer system monitor tool used to collect and show operating system storage input and output statistics. |
| M | |
| MPSTAT | Processor related statistics. It is used in computer monitoring in order to diagnose problems or for build statistics about a computer CPU usage. |
| N | |
| Normalize Scale | Normalization refers to the division of multiple sets of data by a common variable in order to negate that variable’s effect on the data, thus allowing underlying characteristics of the data sets to be compared. This allows data on different scales to be compared, by bringing them to a common scale. |
| P | |
| Process Captured Data | This is a procedure of data collection that includes obtaining useful information on key characteristics produced by the target. |
| PuTTY | This is a terminal emulator application which can act as a client for the SSH, Telnet, RLogin and raw TCP computing protocols. |
| R | |
| Report | Organized presentation of data that shows the behavior of the target’s processes according to the specified parameters such as time range, type of metrics, filters configuration. These parameters can be setup via the Report Settings or/and via the Target Settings panels. |
| Root cause analysis (RCA) | Root Cause Analysis helps to point the actual cause of a problem. RCA is a class of problem solving methods aimed at identifying the root causes of problems or events. The practice of RCA is based on the elimination of problems by fixing root causes. By directing corrective measures at root causes, it is hoped that the likelihood of problem recurrence will be minimized. |
| S | |
| SecureCRT | This is a customizable terminal emulator for Internet and intranet that is used as a client for Secure Shell (SSH1 and SSH2), Telnet and RLogin protocols. SecureCRT can establish connection to remote systems running Windows, UNIX, and VMS. Supports secure file transfers via Xmodem, Zmodem, and SFTP. |
| SQL Statements | SQL-Data Statements perform query and modification on database tables and columns. This subset of SQL is also called the Data Manipulation Language for SQL (SQL DML). |
| SQL Tuning | The aim of tuning a system is either to reduce the response time for end users of the system or to reduce the resources used to process the same work.
One of important aspects of database system performance tuning is the tuning of SQL statements. SQL tuning involves three basic steps:
These three steps are repeated until the system performance reaches a satisfactory level or no more statements can be tuned. |
| T | |
| Target | A target is a database or application server that is the aim of the monitoring and capturing data. |
| Threshold | Threshold is a value that determines the maximum of the data capture based on the pre-defined conditions. |
| V | |
| VMSTAT | Virtual memory statistics is a computer system monitor tool that collects and displays summary information about operating system memory, processes, interrupts, paging and block I/O information. By specifying the interval, it can be used to observe system activity interactively. The syntax and output of vmstat often differs slightly between different operating systems. |
Contacting Enteros
The development team welcomes any comments on the Enteros UpBeat Performance Explorer-i product and information on any problems/limitations found in the product. Please send email to support@enteros.com.
You can contact Enteros for product information and support issues via the following web page or email addresses.
Enteros product information
Web page https://www.enteros.com/
E-mail to Sales & Marketing: sales@enteros.com
Contacting customer support
Web page https://www.enteros.com/support.html
E-mail to Support: support@enteros.com
Technical support
If you have questions about using Enteros UpBeat Performance Explorer-i please contact our technical support staff. Please include the version number, and if your question is about an error message, include the error text as well.
Should you encounter any problems with Enteros UpBeat Performance Explorer-i follow these steps:
- Copy content of the Enteros UpBeat Performance Explorer-i execution console to the diagnostics text file.
- Capture picture of an error to the image file.
- Copy content of the Enteros UpBeat Performance Explorer-i error dialog to the diagnostics text file.
- E-mail these files to support@enteros.com with your request for assistance.
About Enteros
Enteros is an innovative software and services company specializing in Enterprise Production Performance Management. Enteros solutions help IT find and fix performance problems in business-critical applications, websites and data centers with unprecedented speed, accuracy, precision, and scope.
We achieve this by integrating support for production performance management across the production performance lifecycle. From proactive problem identification, real-time performance remediation, and advanced problem diagnosis, to accelerated problem resolution and scalable performance validation, we are the only company that puts it all together in one comprehensive, extensible platform.
Additional information you can find here: https://www.enteros.com/.
Enteros Inc.
1250 Oakmead pkwy, Suite 210
Sunnyvale, CA 94085
Tel. Corporate: +1 (408) 824-1292
Tel. Support: +1 (408) 824-1292, x1
Toll Free: +1 (866) 529-1981
Email: support@enteros.com